Saturday, September 3, 2016

Find Micro Niche

Are you considering starting a blog? Great! You have the first step down.
Now you have to decide what your blog will be about. Of course, you can always start a blog talking about anything and everything. However, these types of blogs aren’t often as successful.
That’s because people search the Internet for one reason only: to solve a problem. That problem may be to find entertainment, or it may be to answer a question. It could be any number of imaginable problems. But when readers are looking to solve a problem and your blog is nothing but ramblings on random topics, how is your blog going to solve their problem?
That’s why niche blogs are popular. For instance, if you want to stay up-to-date on fashion trends, you’ll follow fashion blogs because you trust that they’ll continuously solve your problem. If you want to alleviate boredom, you might hit up Buzzfeed or any number of entertainment blogs that continuously deliver a solution to your boredom.
A niche blog narrows your target audience, but it also keeps them coming back.
How exactly do you “find your niche?” Check out these tips below.


Choose Something You Know and Love

Experts will constantly tell you to blog about what you’re passionate about. It may sound cliche and a little unrealistic on the surface, but there’s a reason for it.
Stacey Roberts on ProBlogger says, “Something that seems present and that shines through in the blogs that I read and love is passion.”
When you blog about what you’re passionate about, several things happen:
  1. You’re more likely to put the time and effort into your blog to make it shine.
  2. You’re less likely to abandon your blog in the future.
  3. You’re less likely to run out of ideas.
  4. It shows through in your writing, and your readers can feel that. This, in turn, will lead to a larger following.
If you go the other route and choose a niche solely because you think it’s profitable, you’re bound to run into burnout and dissatisfaction. Another disadvantage of going the profitability route is that you probably don’t have as much knowledge in those subjects as you do in what you are passionate about. If you don’t know what you’re talking about, why would anyone read your blog?

How to Find Your Passion

Okay, so following your passion would be fine and dandy if you had any idea what your passion was. Just a few questions to get you started include:
  • What are your hobbies?
  • How do you spend your free time?
  • What is the one topic you could go on about for hours if your friends or family let you?
  • What types of classes did you enjoy in high school or college?
  • What do you enjoy reading and learning about?
  • If you could do one thing the rest of your life regardless of salary, what would you do?
Still not sure? Try this exercise: Start with your first instinct. Create a list of 10 separate blog post headlines/ideas. If you can’t come up with 10, then this probably isn’t the niche for you. If you do have 10 but aren’t thrilled about actually drafting the blog posts, then it’s worth considering a different industry.
If those 10 ideas sound good to you, consider writing up those blog posts on your computer before you get into developing your site. If you find it difficult to finish those first 10 posts and are already cringing at the topic, then it’s probably not right for you. The good news is that you didn’t waste time and money setting up a blog that you would only abandon later.
Do you find yourself excitingly coming up with more ideas after writing those first 10 posts? Then you could be on the right track! The good news? Now you have content to put up on your site once you’ve set up your blog.

Find a Hole in the Market

The truth is that no matter what topic you choose to write about, there is already a blog or million out there in that niche. However, not everyone has explored every nick and cranny of every niche. That’s where the profitability can come in.
For instance, Blogging Basics 101 started because there were plenty of blogs about blogging, but there was nowhere for beginners to get their answers.
You can narrow your niche in the same way by adjusting your target audience to those who rarely get attention, such as novice versus advanced individuals in your industry. Another option is to focus on a certain geographical area.
Remember, however, that there must be a need in that end of the market.
Keep in mind that you don’t have to stick with your first blog and its niche if you’re feeling burnt out. However, taking the time to explore which niche you want to start in can save you a lot of time and money in the future instead of jumping from niche to niche.
The biggest thing that will help you choose the right niche is to really think about it instead of jumping in head-first with no idea.
Still not sure? Tell us where you’re getting stuck in your decision-making.

Finding Your Niche

What if you have many passions and no focus? What if you’re not sure how to find your niche? In Finding Your Niche Online and Succeeding In It Amandalyn advises making a list:
If you have a hard time finding your niche, then ask yourself a few questions and write down all of your answers to make a list.
  • What are your hobbies?
  • What things do you like and enjoy doing?
  • How do you spend your free time?
  • What are your favorite topics to talk about?
  • When you were young, what was fun for you?
  • What topics do you know more than most about?
  • Are there certain classes that you have taken extensively?
Finding your niche can be daunting at first because, truly, there are blogs in every niche. You are not going to be the first. However, if you look, you will see that there are holes to be filled. Find a need and fill that need. I started Blogging Basics 101 because there are many intermediate and advanced tech sites for bloggers, but there wasn’t a place for beginners. Blogging about blogging wasn’t my first niche, either; it evolved from my first blog (a personal blog where I certainly didn’t even consider a niche as part of my blogging plan) where I was receiving a lot of questions about how to do specific things with a blog (like crossing out words or adding things to a sidebar).
Let that last part be a lesson too: You may start out with one thing and move to another. Sometimes the best-laid plans are just a stepping stone.

Dominating Your Niche

Now you have your niche, but you want to do even more. What’s the next step? In How to Dominate Your Niche, Brian Clark suggests
What you’re looking to do is intensify the niche by doing something more, or differently (or maybe even better) than the existing players. You do this by first evaluating and understanding where the niche is currently, and position your content in a way that pushes the envelope.
You can evaluate your niche simply by being part of the community of that niche. (Is it me, or do I always come back to community in my articles?) As you read and comment at other blogs in your niche you’ll have a sense of what is being covered and what is not. You can start to fill the holes in the niche or take a new approach to an old issue.
This, I believe, is where you’ll start to position yourself to make some money from your passion. As I wrote in my article Advice for Making Money with Your Blog, if you have a product (via your blog) or are representing a business niche, it is easier to sell that product or specific niche to advertisers. Advertisers know who they want to reach and if your product or business is complementary, then they see the value of advertising with you more readily than they would if you were just a blogger without focus.

You Niche & Your Network

How does being in a particular niche translate to being part of a network (something many bloggers are doing these days)? Deb Ng cautions you to be careful. In Earning Money as a Blogger: Are You Too Nichey for Your Network? Deb writes

Sunday, January 31, 2016

Add Dropdown Menus to Blogger with this Code:

Add Dropdown Menus to Blogger with this Code:

This post has supporting code that goes along with the tutorial on Adding Menus to Blogger. This course includes detailed instructions and a video that will walk you though exactly what to do with the code below. Watch the video to learn what to do with this code >>
Step ONE:  Plan for your menu bar, creating a sitemap with all the links that you want to use.
Step TWO: Grab this code … replacing it with all your links … then add it into a new HTML widget where you want your menu bar to appear:
<!-- start navmenu -->
<ul id='cssnav'>
<li class="active"><a href='http://LINK.com'>Home</a></li>
<li class="sub"><a href='http://CATEGORY-ONE-LINK.com'>Category 1</a>
<ul>
<li><a href='http://SUB-CATEGORY-ONE-LINK.com'>SUB-category1</a></li>
<li><a href='http://SUB-CATEGORY-TWO-LINK.com'>SUB-category2</a></li>
<li><a href='http://SUB-CATEGORY-THREE-LINK.com'>SUB-category3</a></li>
</ul>
</li>
<li><a href='http://CATEGORY-TWO-LINK.com'>Category 2</a>
<ul>
<li><a href='http://SUB-CATEGORY-ONE-LINK.com'>SUB-category1</a></li>
<li><a href='http://SUB-CATEGORY-TWO-LINK.com'>SUB-category2</a></li>
<li><a href='http://SUB-CATEGORY-THREE-LINK.com'>SUB-category3</a></li>
</ul>
</li>
<li><a href='http://CATEGORY-THREE-LINK.com'>Category 3</a>
<ul>
<li><a href='http://SUB-CATEGORY-ONE-LINK.com'>SUB-category1</a></li>
<li><a href='http://SUB-CATEGORY-TWO-LINK.com'>SUB-category2</a></li>
<li><a href='http://SUB-CATEGORY-THREE-LINK.com'>SUB-category3</a></li>
</ul>
</li>
<li><a href='http://CATEGORY-FOUR-LINK.com'>Category 4</a>
<ul>
<li><a href='http://SUB-CATEGORY-ONE-LINK.com'>SUB-category1</a></li>
<li><a href='http://SUB-CATEGORY-TWO-LINK.com'>SUB-category2</a></li>
<li><a href='http://SUB-CATEGORY-THREE-LINK.com'>SUB-category3</a></li>
</ul>
</li>
</ul>
<!-- end navmenu -->
NOTE 1:  There is no styling added yet … so this will not look like much just yet.  But stay with me :)
NOTE 2: You are welcome to add more categories and sub-categories as you need. Just copy the same format as listed in the example.
Step THREE: Go into the Blogger Template Designer (click on CUSTOMIZE … then on ADVANCED … then on ADD CSS) and add the following:
Select Code
/* ----- CSS Nav Menu Styling ----- */
#cssnav {
margin: 0px 0 0 -30px;
padding: 0px 0px 0px 0px;
width: 1050px;  /* Set your width to fit your blog */
font: $(tabs.font); /* Template Designer - Change Font Type, Size, Etc */
color: $(tabs.text.color); /* Template Designer - Change Font Size */
}

#cssnav ul {
background: $(tabs.background.color) $(tabs.background.gradient) repeat-x scroll 0 -800px;
_background-image: none; /* Template Designer - Change Menu Background */
height: 20px; /* Change Height of Menu */
list-style: none;
margin: 0px;
padding: 0px;
}

#cssnav li {
float: left;
padding: 0px;
}

#cssnav li a {
background: $(tabs.background.color) $(tabs.background.gradient) repeat-x scroll 0 -800px;
_background-image: none; /* Template Designer - Change Menu Background */
display: block;
margin: 0px;
font: $(tabs.font); /* Template Designer - Change Font Type, Size, Etc */
text-decoration: none;
}

#cssnav > ul > li > a {
color: $(tabs.text.color); /* Template Designer - Change Font Color */
}

#cssnav ul ul a {
color: $(tabs.text.color); /* Template Designer - Change Color */
}

#cssnav li > a:hover, #cssnav ul li:hover {
color: $(tabs.selected.text.color); /* Template Designer - Change Font Color on Hover */
background-color: $(tabs.selected.background.color); /* Template Designer - Change Font Background on Hover */
text-decoration: none;
}

#cssnav li ul {
background: $(tabs.background.color) $(tabs.background.gradient) repeat-x scroll 0 -800px;
_background-image: none; /* Template Designer - Change Menu Background */
display: none;
height: auto;
padding: 0px;
margin: 0px;
position: absolute;
width: 200px; /* Change Width Of DropDown Menu */
z-index:9999;
}

#cssnav li:hover ul {
display: block;
}

#cssnav li li {
background: $(tabs.background.color) $(tabs.background.gradient) repeat-x scroll 0 -800px;
_background-image: none; /* Template Designer - Change Background */
display: block;
float: none;
margin: 0px;
padding: 0px;
width: 200px; /* Change Width Of DropDown Menu */
}

#cssnav li:hover li a {
background: $(tabs.selected.background.color); /* Template Designer - Change Background of Link on Hover */
}

#cssnav li ul a {
display: block;
height: auto;
margin: 0px;
padding: 10px;
text-align: left;
}

#cssnav li ul a:hover, #cssnav li ul li:hover > a {
color: $(tabs.selected.text.color); /* Template Designer - Change Text Color on Hover */
background-color: $(tabs.selected.background.color); /* Template Designer - Change Background on Hover */
border: 0px;
text-decoration: none;
}
NOTE: I’ve listed notes next to a few lines of this code to point out what you can change and style for your own blog.

What Is SEO / Search Engine Optimization?

What Is SEO?

SEO stands for “search engine optimization.” It is the process of getting traffic from the “free,” “organic,” “editorial” or “natural” search results on search engines.
All major search engines such as Google, Bing and Yahoo have primary search results, where web pages and other content such as videos or local listings are shown and ranked based on what the search engine considers most relevant to users. Payment isn’t involved, as it is with paid search ads.

VIDEO: SEO Explained

New to SEO? Start with this quick and easy to understand video about search engine optimization. It’ll quickly cover the basics:

More SEO Advice For Beginners

For more basic but also in-depth advice, our Periodic Table Of SEO Success Factors, shown below, introduces you to all the key concepts you need to know:
Periodic Table Of SEO
You can click on the table to view a larger version of it. You can download a copy to print for easy reference!

Search Engine Land’s Guide To SEO

As a companion to the table, Search Engine Land’s Guide To SEO explains the ranking factors in more depth, in a tutorial providing tips and advice on implementing them.
Links to the entire guide are shown below (start at the beginning, and each page will take you to the next):

More SEO Guides & Books

Another excellent guide is Google’s “Search Engine Optimization Starter Guide.” This is a free PDF download that covers basic tips that Google provides to its own employees on how to get listed. You’ll find it here. Also well worth checking out is Moz’s “Beginner’s Guide To SEO,” which you’ll findhere, and the SEO Success Pyramid from Small Business Search Marketing.

Daily SEO News & Expert SEO Advice

In addition to daily news stories from our editorial staff, Search Engine Land publishes daily articles from expert contributors that cover SEO issues mainly from an in-the-trenches perspective.  Browse the SEO Channel for the most recent SEO news stories and expert columns, or sign up to receive all of our SEO related content via email.

Search Engine Land’s SEO Library

The SEO Library is an area within Search Engine Land that provides a collection of all stories we’ve written on the topic of SEO. We also have sub-categories, including:
Also see our related Link Building category and these sub-categories:
In addition to covering SEO generally, Search Engine Land also has search engine optimization areas specifically for each of the major search engines:
Also within our library is the How To: SEO section, which is devoted to practical tips and tactics about search engine optimization.

10 Social Media Tools That Make Everything Easier!

10 Social Media Tools That Make Everything Easier!
Social media marketing can be a pretty time consuming focus for any business, especially when you have to stay on top of multiple platforms like Facebook, Twitter, Google+, LinkedIn, the list goes on.
While social media is definitely a huge part of many small business marketing plans, it is still one facet of a much bigger picture and many entrepreneurs find themselves wishing there were more hours in the day to focus on the other aspects of their business.
To help give you a little more time in your day, yet continue to promote your social media presence, here’s a list of ten social media tools that I use (some more regularly than others) with my team, that can help your business top on top of things a little more.
If you’re wanting to get your social media to even higher heights without being involved every step of the way, you should also check out my guide on How to Work with a Virtual Assistant to Manage Your Social Media

Day-to-Day Management

Buffer –  A very popular tool for sharing content and supports Facebook, Twitter accounts, LinkedIn and Google+ profiles. The tool allows you to queue your posts in advance and provides you with analytics of your posts. Its clean and user-friendly interface also makes it a particular favorite among small business owners that are strapped for time.
Social Oomph – Since engagement is key in social media, this tool will help make things a lot easier for you. Social Oomph’s edge over other social media management tools is that it offers the auto-responder, auto-direct message and auto follow features as premium upgrade features.   
Screen Shot 2014-06-23 at 10.48.46 PMBuffer’s homepage message – I couldn’t agree more!

Content Collating and Curation

Feedly – The tool presents new content from several news feed categories that you can choose from, it also highlights popular content that you might find interesting. The tool can be used from your desktop or mobile devices to make sure you can check your feeds regularly. You can also alter the way it can be viewed to suit how you prefer to take in information.
Pocket – For busy entrepreneurs who may not have time during the day to read all the interesting articles they come across, read-it-later tools are a godsend. Pocket is a particular favorite with its clean and flat design, it makes it very easy to it to sort through content which you can save to read later either through your desktop or mobile devices.

Visual Content Creation Tools

Canva – Visual marketing is definitely here to stay with more and more people preferring to see content than read it. This tool can help you create effective graphic design with a user-friendly interface and beautiful design templates that suit beginner designers. The app is free though if you would like to avail of Canva’s stock photos, you will need to pay for them.
Visual.ly – If you feel like you don’t have enough time to come up with visual content, you can head on over to Visual.ly’s marketplace and let the professionals handle it. They specialize in infographics, videos, interactive and presentations, presenting quality content for much less than your average agency’s price.
Screen Shot 2014-06-23 at 10.50.36 PM
 Now everyone can be a graphic designer, thanks to Canva!

Analytics and Reporting

Klout – Klout is one of the more popular social media monitoring tools that measures a user’s social influence based on their activity on sites like Facebook, Twitter, Foursquare, Instagram, etc. Recently, they have introduced a new version of Klout with a feature that allows you to curate content and share it with your audience as well.
Quintly – This tool provides you with analytics for several social media platforms such as Facebook, Twitter, YouTube, Google+ and LinkedInYou can keep track and benchmark your social media performance along with your competitor’s. One popular feature is that it is highly customizable and has an easy-to-use dashboard for you to navigate from.

Miscellaneous ‘Cool’ Tools

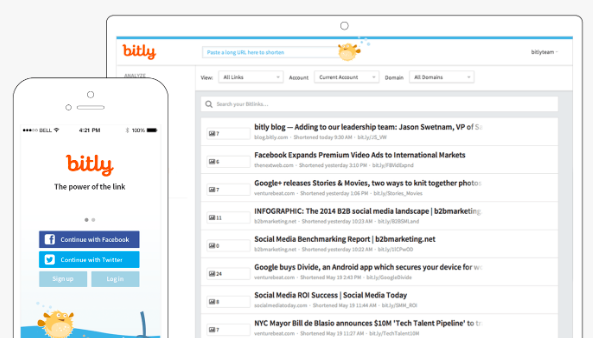
Bitly –  Sometimes you find yourself having to get extra “creative” with spelling when composing a tweet, which is where Bitly can help. Bitly can shorten your links as well as track the link’s overall performance afterwards to see which ones work with your audience.
Mention – It’s always important to track what people are saying about you and your business, though the task can be daunting when there are so many social media platforms out there. Mention is a social media monitoring tool that informs you when someone mentions your name, business or any other keywords you would like to keep track of.
Screen Shot 2014-06-23 at 10.54.29 PM
I’ve been a Bitly fan for a long time – it’s so easy to use, too!
As you can tell, there are a lot of ways you can skin the social media cat!
However, for me, as a busy entrepreneur and multiple business owner, its all about maximizing my time in the creation of the content and it’s results, along with minimizing the time I actually spend doing it all!

6 ways that businesses fail on social media

Make sure to avoid these common missteps

Target audience: Businesses, digital marketers, social media programmers, advertising agencies, SEO specialists, entrepreneurs, educators, journalists, Web publishers.
M
any small business owners use social media as a marketing and customer-service tool. A recent industry survey tells us that 92 percent of marketers surveyed call social media important to their business. Despite the widespread use of social media, many business owners are inadvertently hurting their brand through their efforts, instead of growing and building their business. There are countless benefits of using social media, but remember that there are risks associated with using social media in your business. Here are six mistakes you may not realize you are making on social media.

Not responding to questions and comments

1It isn’t enough to simply post on social media. Posting, tweeting, pinning and so on are just one piece of the puzzle. You need to take as much time to read and engage your followers’ questions and comments as you do posting your own stuff. Respond quickly to comments and answer questions – it’s important!

Not being your true, authentic self

2It may seem like you can pull off a different personality on social media. You may have an idea in your head or who you should or want to be on social media – but this isn’t a smart strategy over the long term. Instead, be yourself. Share your true opinions and thoughts and let your personality shine through. Your audience would rather see and connect with the real you instead of one you pretend to be.

Thinking ‘It’s all about me! me! me!’

3Constantly promoting your products or business is one of the biggest and most harmful mistakes you can make. You don’t always need to make your business at the forefront of your posts. Quit the constant selling and stop subtly relating all posts back to your product or business. You may wonder how to write for social media. Strive to provide valuable content to your audience to keep your business in their minds because they like you instead of driving them away.

Not building relationships

4Social media isn’t about throwing your message in the face of your fans and followers. It isn’t even about sharing everything you know. If you aren’t working to build a community and foster relationships, you’re missing the most important aspect of social media marketing.

Over-posting

5A common reason people unfollow brands on social media is because they post too frequently. While there is no optimal number of times to post on each social networking site, take a look at this infographic, which can provide a great guideline of how often to post on various social media sites. This might be a good guideline: Facebook: 3 to 10 times a week; Twitter: at least 5 times a day; Pinterest: 5-10 times a day.

Posting the same type of content repeatedly

6Think about what you post on social media. Do you post just a few types of content? Do you share your blog posts and ask questions? Posting the same things time and again will cause your audience to block you – and your business – out.
If you’ve ever made any of these mistakes, you’re in good company. Learn from those missteps and remember that this form of marketing is an extremely powerful tool that can help your business grow and thrive when used consistently.

AdSense 970*90 Ad Unit : Bigger is Better

AdSense has expended it’s ad unit by adding new 970*90 ad unit. Earlier, AdSense added 300*600 ad unit, and new 970*90 ad unit is more targeted to websites with large width size. This is perfect for wide-screen. This ad unit is already available for all the AdSense publishers, and you can grab the code right now. Here are few details about new ad unit, and things to keep in mind.

AdSense New Bigger Ad unit: 970*90

This ad unit is best for placing in header. An ideal position would be before or after the navbar. Specially if you are using 728*90 ad unit, you should consider replacing it with 970*90 ad unit. It’s a new ad unit, and you will not find much image based ads for now, so when you are generating code for this ad unit size, make sure to select both (Image + text ads). If text ads will make you website design look bad, you should wait for couple of months, before integrating this ad type. Right now, you will notice more of text ads after implementing this ad unit. Here is an example of how your website will look with this new AdSense ad unit:
Adsense 970*90
To generate the ad code for this new ad unit, login to your AdSense account. Click on my Ads > New Ad unit and select 978*90 under ad unit size. In ad type select Text & image ads, and select the channel for your website.
AdSense biggest ad unit
Ideal placement:
Do remember AdSense do offer CPM ads, but most of the ads are CPC ads, so don’t place ad units below the fold. This ad unit will work around header of your website.
  • Place it around your blog navbar
  • Replace current 728*90 ad unit with 970*90 ad unit
AdSense allows maximum 3 ad unit and 3 text ad units on a webpage for a normal publisher, so make sure you select the best ad units, and place to smartly to improve your revenue from AdSense. Here are few more guides related to AdSense that you should refer to:
  • AdSense has expended it’s ad unit by adding new 970*90 ad unit. Earlier, AdSense added 300*600 ad unit, and new 970*90 ad unit is more targeted to websites with large width size. This is perfect for wide-screen. This ad unit is already available for all the AdSense publishers, and you can grab the code right now. Here are few details about new ad unit, and things to keep in mind.

  • AdSense New Bigger Ad unit: 970*90

  • This ad unit is best for placing in header. An ideal position would be before or after the navbar. Specially if you are using 728*90 ad unit, you should consider replacing it with 970*90 ad unit. It’s a new ad unit, and you will not find much image based ads for now, so when you are generating code for this ad unit size, make sure to select both (Image + text ads). If text ads will make you website design look bad, you should wait for couple of months, before integrating this ad type. Right now, you will notice more of text ads after implementing this ad unit. Here is an example of how your website will look with this new AdSense ad unit:

  • Adsense 970*90

  • To generate the ad code for this new ad unit, login to your AdSense account. Click on my Ads > New Ad unit and select 978*90 under ad unit size. In ad type select Text & image ads, and select the channel for your website.

  • AdSense biggest ad unit

  • Ideal placement:

  • Do remember AdSense do offer CPM ads, but most of the ads are CPC ads, so don’t place ad units below the fold. This ad unit will work around header of your website.

  • Place it around your blog navbar
  • Replace current 728*90 ad unit with 970*90 ad unit
  • AdSense allows maximum 3 ad unit and 3 text ad units on a webpage for a normal publisher, so make sure you select the best ad units, and place to smartly to improve your revenue from AdSense. Here are few more guides related to AdSense that you should refer to:

  • --Tips to increase AdSense earning

  • ---10 simple tips to avoid violating AdSense TOS

5 Domain Name Suggestion Tools

Whenever we start any new website, one of the most important factors involved in the process is the selection of a domain name. There are many domain name suggestion tools  available on the market, and in today’s post I have compiled a list some of the more highly recommended of these tools, which will help you to find domain names based on your keywords or name ideas.
One approach which I always suggest is to go for branded or keyword-rich domain name, depending on your new site’s business model. If you are creating a micro-niche site, it’s always a good idea to shoot for a name that has your keyword in it. If you’re looking for long term engagement, I would suggest that you go for a branded name like ShoutMeLoud, Labnol, Lifehacker and so on. Branded names such as these  are very useful in the long run, and create a significant impact. In particular, a name which is easy to remember will always be helpful. Try not to use a name that is hard to spell or type.

List of domain name suggestion tools:

I recently posted an article on the domain name suggestion tool Domainsbot. (Thanks to Google, I was able to get my hands on four domain name search tools.) Domain name suggestion tools come in very handy when you’re searching for some quality domain names based on keywords, (especially when you get an offer from some domain registrar to buy a domain for $1 using their special offer).

I recently posted an article on the domain name suggestion tool Domainsbot. (Thanks to Google, I was able to get my hands on four domain name search tools.) Domain name suggestion tools come in very handy when you’re searching for some quality domain names based on keywords, (especially when you get an offer from some domain registrar to buy a domain for $1 using their special offer).

Before you use any of the following tools, I highly recommend that you read the following tutorial:
So let’s start with a handy list of sites which will help you to find the best domain name for your new site.
Note:  Some common features all these sites offer:
  • You can buy a domain directly from any of the services
  • Domain available or sold


  • Some of them find listings from the used domain marketp

1. Domainsbot :
Domainsbot is a simple domain suggestion tool which also uses your keyword to give you some nice domain suggestions. What I like about this site is that when you search for a niche-based keyword, it also finds the domain listings from SEDO and Godaddy along with prices. This can be helpful in choosing the best keyword-rich domain name for your new site.  It really is a perfect keyword domain name generator tool. Learn more aboutDomainsbot.
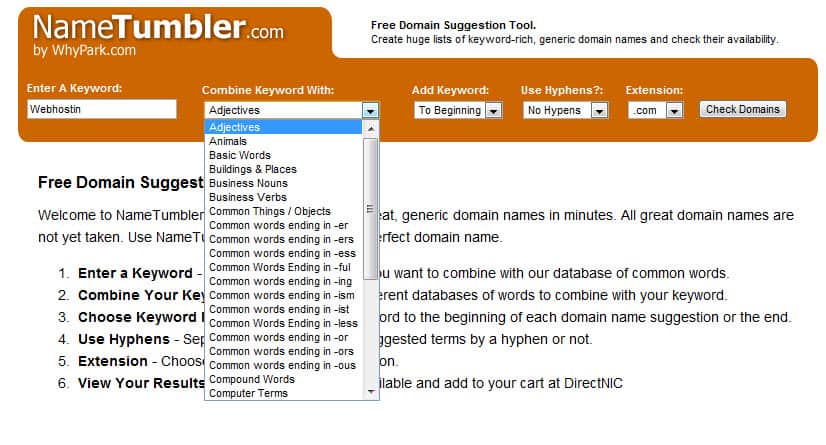
2. NameTumbler :
NametumblerNameTumbler is another simple domain suggestion tool which allows you to  make changes in your domain search. You can decide the placement of your keyword for domain name suggestions. What makes this tool worth a mention is that it allows you to add your keyword and combine it with many keyword suggestions. For example, add it with an animal’s name, add a prefix or suffix, and check availability. In short, it tumbles names to find available domain names!<NameTumbler>
3. Domain suggest tool:
domainIT
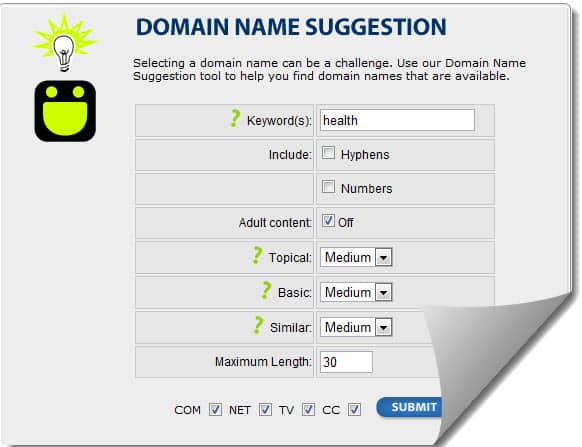
This tool allows you to search for domain names with the extensions .com, .cc, .TV, .net. By default the adult name suggestion is off, though you can turn it on. This would not be a good idea, however, as many firewalls block access to sites based on keywords in domain name. <Link>
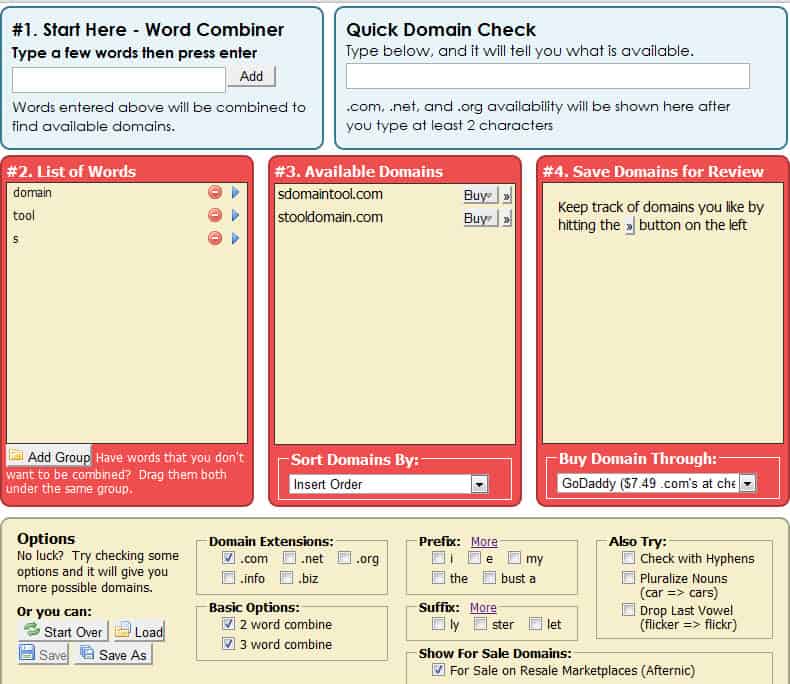
4. BustAName :
Bustaname
BustAName is my second favorite domain search tool after Domainsbot. It makes your mind mapping so easy, with lots of suggestions and words.  You can add multiple keywords, and it jumbles them to see if there are any available domain names. You can quickly add a prefix or suffix which also makes it easier to find your desired domain name. <Link>
I hope this list of domain suggestion tools will be very helpful for you as you work to find the best domain name for your next venture.
Do let us know if you use other similar tools that you have found helpful for finding quality available domain names.